Menu structure
If you already went through the How to create a menu tutorial, this page goes deeper into menu structure and the more useful keys.
Menu file
Section titled “Menu file”Each menu file can contain only one menu or several related menus.
Single menu file
Section titled “Single menu file”You may already have seen a single-menu file in the How to create a menu tutorial. Below is an example of a single-menu file.
title: "&8Menu"size: 6activators { command: "menu"}items: [ { slot: 0 texture: "783db86bb86dc2ec494e2ffca77765810ed11a52efef4e5c85252ec39a26c0" name: "Purple-head dwarf" lore: [ "The talking head!" "" ">> Click to say \"Hello!\"" ] rules { permission: "some.permission" } click { rules { money: 100 } actions { command { player: "me Hello!" } } denyActions { message: "You don't have enough money" sound: "ENTITY_VILLAGER_NO" } } }]Menu structure may seem difficult at first sight, but don’t be afraid, as you will move forward through the docs you will learn how each part of the plugin works.
Multiple menu file
Section titled “Multiple menu file”If you are making a small sub-menu, this may has sense to do it in a single file with other related menus. To do this, the plugin has a design that allows you to create several menus in a single file. In this case, the menu name will be considered the name of the block in which it is created. Here is an example:
menus { my_awesome_menu { // Unique menu name title: "My menu" size: 6 items: [ ... ] } my_another_menu { title: "My another menu" size: 1 items: [ ... ] }}All menus listed in the main menus block. In the example above you can see 2 separate menus in the same file.
Menu properties
Section titled “Menu properties”The table below contains all the properties of menu which you can specify in menu root.
| Name | Data type | Required | Description |
|---|---|---|---|
| title | String | Yes | Set the title of a menu |
| size | Number | Yes | Set the vertical size of a menu (rows count) |
| type | String | No | Inventory type (default: chest with size rows). See Inventory type. |
| items | Objects list | No | Menu items (buttons) |
| activators | Object | No | An activators to open menu |
| rules | Objects list | No | A rules to open menu. If even one of those rule is false then menu won’t be opened |
| preOpenActions | Object | No | An actions, that will be performed before inventory creation and menu opening |
| openActions | Object | No | An actions, that will be performed before the menu opened, but after open rules successfully checked and inventory created |
| postOpenActions | Object | No | An actions, that will be performed after the menu opened |
| denyActions | Object | No | An actions that will be performed if at least one rule is false |
| closeActions | Object | No | An actions that will be performed after menu closed |
| updateActions | Object | No | An actions that will be performed when menu updated by updateInterval |
| updateInterval | Number | No | An interval of menu refreshing in ticks. If not specified, menu will not be updated automatically |
| For drag-and-drop | |||
| draggable | Slot format | No | Define allowed slots for placing and taking items |
| onPlaceItem | Object | No | An actions that will be performed if player place item in allowed slot |
| onTakeItem | Object | No | An actions that will be performed if player take item from allowed slot |
| onDragItem | Object | No | An actions that will be performed if player place or take item using allowed slots |
To learn the drag-and-drop feature, see the Drag and drop page (for advanced users).
Auto refresh
Section titled “Auto refresh”A bit more detailed about the updateInterval property. If you want to create a menu with auto refresh of items, placeholders and any other dynamic data, you can specify the interval for updating the menu. For example:
title: "Dynamic menu"size: 1updateInterval: 40items: [ { slot: 0 material: CAKE name: "Players: %server_players%" }]The menu above will be refreshed every 2 seconds. Along with this, the item that display the number of players on the server will be refreshed along with the placeholder %server_players%.
In the example above we used the default placeholders. More about placeholders is on the Placeholders page.
If you want to do some job when menu updated by updateInterval, you can use updateActions block.
title: "Timer"size: 1updateInterval: 20updateActions { incVar: "counter:1"}In this example, global variable counter will be incremented every time menu updated. In our case, with a period of 1 second (20 ticks).
Buttons
Section titled “Buttons”The button in the menu is an ordinary item (see item format) with extra functionality. Below are all the parameters you can specify in addition to the standard item parameters.
| Name | Data type | Required | Description |
|---|---|---|---|
| slot | Multiple | Yes | Set position of an item |
| rules | Objects list | No | A rules to display buttons in the menu |
| mrules | Objects list | No | Additional rules block, existing only inside the button. These rules have no effect on whether the button is displayed. They are needed only for independent checks and performing actions |
| click | Object | No | Contains actions which will execute when player click on item |
As you can see, only the slot property required for the button, because the menu item always must be in a specific slot or slots.
Display rules
Section titled “Display rules”A buttons can be displayed without any rules. But you can also add rules for displaying a button in the menu’s inventory. These rules will limit showing some buttons if the player doesn’t matches with the rules.
items: [ { slot: 0 material: IRON_SWORD }, { slot: 0 material: DIAMOND_SWORD rules { permission: "some.perm" } }]In this example, the menu has two items. The first (Iron Sword) will be always displayed in slot 0. The second (Diamond Sword) will be displayed in slot 0 and will replace the first item only if the player have permission some.perm.
Click processing
Section titled “Click processing”Almost any menu is useless without processing button clicks. The plugin provides a convenient system for processing clicks on buttons.
Let’s take a look at the click block. For example:
items: [ { slot: 0 material: DIAMOND_SWORD click { left { message: "Hello" } } },]Inside the click block, the left block is specified. This is just type of click that triggers the actions inside the block. Inside the block responsible for the type of click, you can describe the same actions and rules as in the click block.
You can find all types of clicks here. We’ve described the most useful of them.
| Click type | Description |
|---|---|
| LEFT | Left mouse button click |
| RIGHT | Right mouse button click |
| MIDDLE | Middle mouse button click |
| SHIFT_LEFT | Left mouse button click with Shift pressed |
| SHIFT_RIGHT | Right mouse button click with Shift pressed |
| DOUBLE_CLICK | Double left mouse button click |
Any of these types can be used inside click block either individually or together with other types.
items: [ { slot: 0 material: STONE click { message: "That was the click" // Will be displayed on any click right { message: "That was RMB click" // Will be displayed on RMB click } middle { message: "That was MMB click" // Will be displayed on MMB click } } }]Inventory type
Section titled “Inventory type”You can use other types of inventory, not only chest. For this use the type property of the menu. This property accepts an inventory type name. All type names are listed in the Bukkit Javadoc (for the latest Spigot version).
If you use custom inventory type, you can omit a slot property.
Below is example of menu with custom inventory type.
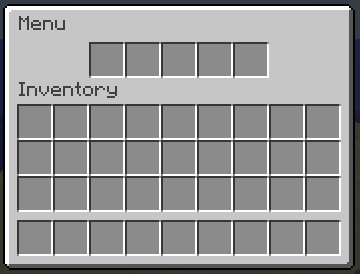
Hopper
Section titled “Hopper”Code: :
title: "Menu"type: HOPPERactivators { command: "menu"}items: []Result:
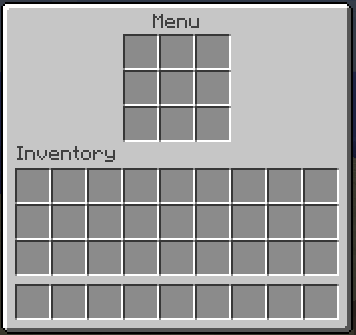
Dispenser
Section titled “Dispenser”Code: :
title: "Menu"type: DISPENSERactivators { command: "menu"}items: []Result:
Binding button properties to rules
Section titled “Binding button properties to rules”You can bind some button properties to rules. If player matches specified rules, then this property will be applied to final item. For this, AbstractMenus has special item property called bindings. Example:
items: [ { slot: 0 material: CAKE bindings { props { material: LEATHER_LEGGINGS } rules { gamemode: CREATIVE } } }]In this example, if player has CREATIVE gamemode, then item’s material will be changed to LEATHER_LEGGINGS.
The bindings block has next format:
-
props- Item properties to apply -
rules- Regular rules to check player
Inside props block you can specify one or multiple item properties, as you do it just inside item. All these properties will be added to item only if player matches rules, specified inside rules block.
Inside rules block you can specify any rules, like in any other rules block.
Multiple bindings
Section titled “Multiple bindings”You can add multiple bindings to one item. For this, just change the bindings block to list of objects. Example:
items: [ { slot: 0 material: CAKE bindings: [ { props { material: LEATHER_LEGGINGS } rules { gamemode: CREATIVE } }, { props { lore: [ "" "You are VIP!" ] } rules { permission: "group.vip" } } ] }]Here, we changed bindings block to list and added new binding. Now, if player has group.vip permission, then new lore will be applied to item.