Item format
An item can be specified not only as a button in a menu. This object can be used in rules, actions and activators. However, item always has one format.
All item properties
Name |
Data type |
Example |
Description |
|---|---|---|---|
slot |
Multiple |
See example Slot |
Set slot for item. Not a regular item’s property. Can be used only for menu items or in some actions and rules |
clickCooldown |
Number |
|
Set click cooldown in ticks (1 second = 20 ticks). Will be reset after menu closed or refreshed with |
Material installers |
|||
material |
String |
|
Set the item material by name. On MC |
texture |
String |
See example Texture |
Using custom head texture by texture id, url, or base64 encoded. You can find many heads on the https://minecraft-heads.com |
skullOwner |
String |
See example Skull Owner |
Set player’s skin on head |
hdb |
String |
|
Set the head by the identifier from the HeadDatabase |
mmoitem |
String |
|
Take an item by type and id from the MMOItems |
itemsAdder |
String |
|
Take a custom stack defined in ItemsAdder registry by their namespaced id |
oraxen |
String |
|
Take a custom stack defined in Oraxen plugin |
equipItem |
String or Object |
See example Equiped Item |
Take item from player’s inventory. See all slot types |
serialized |
String |
See example Deserialize from base64 string |
Deserialize item from base64 string |
Other properties |
|||
name |
String |
|
Set display name |
data |
Number |
|
Material data (deprecated since MC |
count |
Number |
|
Amount of item stack |
damage |
Number |
|
Set damage (bar under item) for damageable items. The higher the number, the lower the durability of the item |
lore |
Strings list |
See example Lore |
Set item lore (text under name) |
glow |
Boolean |
|
Set glowing effect (via invisible enchantment) |
enchantments |
Object |
See example Enchantments |
Add enchantment to item |
color |
String |
See example |
Colorize armor or potion |
flags |
Strings list |
See example Flag |
Add item flags |
unbreakable |
Boolean |
|
Make item unbreakable (works on |
potionData |
Objects list |
See example Potion effect |
Add various potion effects for item, if this item is potion |
fireworkData |
Object |
See example Firework |
If material is |
bookData |
Object |
See example Book |
Add book’s content and metadata (author, title) for writable book |
bannerData |
Object |
See example Banner |
Colorize banner item |
shieldData |
Object |
Similar to Banner |
Colorie shield item, as banner |
model |
Number |
|
Custom model data |
enchantStore |
Object |
Same as Enchantments |
Allows you to save the enchantment in an item that can later be used to enchant items on the anvil. Need for creating an enchantment book ( |
recipes |
Objects list |
Same as recipe format |
Create a book with custom recipes (knowledge book). Works with |
nbt |
Object |
See example NBT tags |
Add NBT tags to the item |
Special properties |
|||
bindings |
Objects list |
See example Binding button properties to rules |
Binds some properties to rules. If player matches specified rules, then these properties will be applied to item |
Note
Material installer is a property that set the item’s material and optionally other parameters. You should use only one material installer property for an item.
Slot
The item’s slot is the cell in the inventory (of the menu or player’s) where the item will be placed. The slot can be specified in several ways:
Way 1. X, Y coordinates
slot: "4,3" // x,y
In this example, x and y means the horizontal and vertical position of the item, respectively. The countdown starts from 1. The image below can be useful to understanding this.
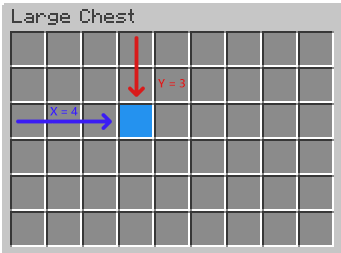
How XY slots works
Way 2. Index
slot: 0
You can specify slot just by a real index. To find out the number of the desired slot, you can use this cheat sheet:
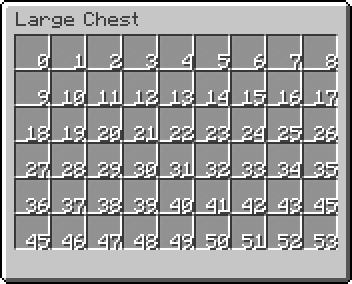
Slots indexes
Way 3. Range
slot: "0-6"
To place one item inside several slots, you can use ranged slots format. An item with slot above will be placed in cells with index 0, 1, …, 6. This format can be useful to fill menu with some background item without manual putting them in every slot.
Way 4. Matrix
items: [
  {
    slot: [
      "xxxxxxxxx",
      "x-------x",
      "x-------x",
      "x-------x",
      "x-------x",
      "xxxxxxxxx"
    ]
    material: BLACK_STAINED_GLASS_PANE
  }
]
If you need more complex positioning, you can specify slot as cells matrix. For example, you need set a border for your menu. You can make something like above. Then this will look like this:
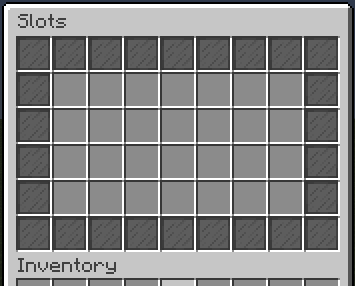
Result of using cells matrix
Every char of this matrix is a some slot.
Char - is always empty slot.
Char x represents slots which will be filled with current item. You can specify any other char except -.
The size of matrix may be equal or less than size of menu. This mean, you can specify slot like that with the same size of menu:
slot: [
  "xxx",
  "x-x",
  "xxx"
]
And menu will looks like this:
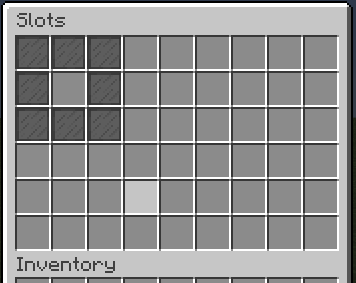
Result of using lesser cells matrix
Note
The slots counting in cells matrix always starts from top-left.
Attention
Items placed by ranged slots and cells matrix doesn’t cloning. This mean that if you change property of some item, changes will apply to other items placed by this slot. So you shouldn’t use this slot format for unique items.
Skull Owner
This property can be used to get player’s head. It takes player name as argument. For example:
skullOwner: "Notch"
If you need to get head of player who opened menu, use placeholder to get player name first:
skullOwner: "%player_name%"
Important
AbstratMenus loads player’s skin on join to server. If you use name of player who is not joined to server, plugin will try to load skin data before menu will be opened. If you use static names in skullOwner, more suitable way is to use texture property.
Note
If some skin data cannot be loaded (for example, if player don’t have skin), head will be empty (Steve or Alex).
Texture
You can specify texture using one of the following formats.
Texture URL
Direct link to the texture image. Example:
texture: "https://textures.minecraft.net/texture/a45d68aea87cc3fd20b96b21e18255db298b2eac986526473116bd3b5750b787"
Texture Hash
Texture hash is a sha-1 hash of skin image.
This hash you can find in the end of each texture url, avoiding static https://textures.minecraft.net/texture/ prefix.
Example:
texture: "a45d68aea87cc3fd20b96b21e18255db298b2eac986526473116bd3b5750b787"
Using this way, the plugin will add the static prefix and a final url will be https://textures.minecraft.net/texture/a45d68aea87cc3fd20b96b21e18255db298b2eac986526473116bd3b5750b787
Base64 encoded
Also often called “Texture value”.
This is a url to texture, included in JSON and encoded using Base64 encoder.
You can use such value with base64: prefix. Example:
texture: "base64:eyJ0ZXh0dXJlcyI6eyJTS0lOIjp7InVybCI6Imh0dHA6Ly90ZXh0dXJlcy5taW5lY3JhZnQubmV0L3RleHR1cmUvYTQ1ZDY4YWVhODdjYzNmZDIwYjk2YjIxZTE4MjU1ZGIyOThiMmVhYzk4NjUyNjQ3MzExNmJkM2I1NzUwYjc4NyJ9fX0="
Equiped Item
Item property to get item from player’s inventory. By default it takes item from inventory of player who opened menu. Example:
equipItem: HEAD
Tip
All slot types you can find here
But you also can take item from another player’s inventory. For this you need to transform this property to object and set player name. Placeholders are supported. Example:
equipItem {
  player: "%player_name_placeholder%"
  slot: HEAD
}
Deserialize from base64 string
The serialized item property allow to deserialize item from base64 string. Such string usually can be retrieved using Item extractor placeholder, for example, when you use drag-and-drop feature. Example:
{
  slot: 0
  serialized: "%moved_item_serialized%" // Placehodler returns base64 string
  name: "New item name"
  lore: "New item lore"
}
If add other item properties, like name they will replace present properties from deserialized item.
Note
If you save such string into variable and then use it after server update or downgrade, item may be not compatible with different server version.
Lore
The lore is a list of strings. Each new line in the list is a line in the item’s lore. For example:
lore: [
  "Line 1",
  "Line 2",
  "Line 3"
]
Enchantments
Enchantments has format <enchantment>: <level> where:
- <enchantment>:
Bukkit’s enchantment name. You can find it here
- <level>:
Level of the enchantment. Minimal level is
1.
Example:
enchantments {
  DAMAGE_ALL: 1
  DURABILITY: 2
}
Color
Color used to paint items that support it, such as leather armor or potion. Color can be specified in one of 3 ways. In the examples, we will show a way to specify white color.
Way 1. RGB
RGB values (0-255) separated by comma.
color: "255,255,255" // r,g,b
Way 1. Spigot color name
Use a native Spigot color names.
color: WHITE
See also
You can find list of colors here
Way 1. HEX
Hexadecimal format like in CSS.
color: "#FFFFFF"
Note
Colors can be used only for painting leather armor, potions and other materials that supports it.
Flag
Flags are used to add new properties to item. The list of flags is a strings list like lore. For example:
flags: [
  "HIDE_UNBREAKABLE",
  "HIDE_ENCHANTS",
]
Or if there is only flag:
flags: "HIDE_ATTRIBUTES"
Spigot currently has the following flags:
- HIDE_ATTRIBUTES:
Hide item attributes such as damage.
- HIDE_DESTROYS:
Hide the information about item durability.
- HIDE_ENCHANTS:
Hide item enchantments.
- HIDE_PLACED_ON:
Hide information that an item can be built/placed on something like this.
- HIDE_POTION_EFFECTS:
Hide potion effects :D.
- HIDE_UNBREAKABLE:
Hide the
unbreakablelabel.
Note
A flags for each Spigot versions might be different or missing. Check flags for your version only on this or similar pages. Do not trust the list above for 100%.
Potion effect
This property is a list of objects containing effects of the potion. Each item in the list is a potion effect. Example:
potionData: [
  {
    effectType: FAST_DIGGING
    duration: 100
    amplifier: 1
  },
  {
    effectType: SPEED
    duration: 100
    amplifier: 2
  }
]
Each potion effect has 3 required parameters:
- effectType:
Potion effect type. All types can be found here.
- duration:
Potion effect duration in ticks (1 second = 20 ticks).
- amplifier:
Power (level) of the effect.
Note
The potionData property can be used only if item’s material supports this.
Firework
To create a colored firework, use fireworkData property. Example:
fireworkData {
  power: 2
  effects: [
    {
      type: BALL
      trail: false
      colors: [
        "#FFFFFF",
        "#FF0000"
      ]
      fadeColors: [
        "#000000",
        "#00FF00"
      ]
    }
  ]
}
The power parameter set the lifetime of firework. This is optional parameter. By default its 1.
The effects parameter is a list of objects. Each object is a firework effect and has several parameters:
- type:
Type of the shape when firework explodes. You can find all firework types here.
- trail:
Is firework has trail while launched.
- colors:
List of colors when firework’s explode start.
- fadeColors:
List of colors when firework’s explode fade.
You can add several objects in fireworkData property. Then it will explode with all specified effects.
Note
This property will only work if the material of the item is FIREWORK_ROCKET (or FIREWORK on Spigot 1.12 and lower).
Book
This property can be used to create a written book with pages. Example:
bookData {
  author: "Peter Piper"
  title: "&e&lTitle"
  pages: [
    "First page content",
    "Second page content"
  ]
}
This property has several parameters:
- author:
The book’s author which will be displayed.
- title:
The displayed book’s title.
- pages:
The list of strings. Each new line is a new page content.
Note
The bookData property will only work for WRITTEN_BOOK material.